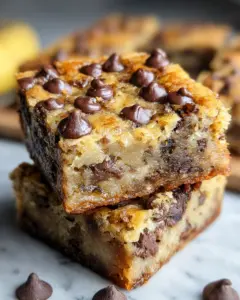
These rich and fudgy Red Velvet Brownies are a delightful twist on the classic dessert. With their vibrant red hue and sweet white chocolate chips, they’re perfect for any occasion—from holidays to birthday parties or even just as a treat for yourself. The combination of moist texture and subtle cocoa flavor makes these brownies irresistible!

Why You’ll Love This Recipe
- Decadent Flavor: These Red Velvet Brownies deliver a rich taste, enhanced by white chocolate chips that melt in your mouth.
- Easy to Make: The steps are simple, making it perfect for both novice bakers and experienced cooks.
- Perfect for Any Occasion: Whether it’s Valentine’s Day or a casual gathering, these brownies impress every time.
- Versatile Dessert: Serve them plain or with ice cream; they fit any dessert style you desire.
- Vibrant Presentation: Their striking red color makes these brownies stand out on any dessert table.
Tools and Preparation
Before diving into making these delightful Red Velvet Brownies, gather your tools. Having everything ready ensures a smooth baking process.
Essential Tools and Equipment
- 9×9-inch baking pan
- Parchment paper
- Mixing bowls
- Whisk
- Measuring cups and spoons
- Nonstick cooking spray
Importance of Each Tool
- 9×9-inch baking pan: Perfect size for achieving that ideal brownie thickness.
- Parchment paper: Helps with easy removal of brownies and creates cleaner edges when slicing.
- Whisk: Ensures all ingredients combine smoothly without lumps.
Ingredients
For the Brownies
- 12 tablespoons unsalted butter, melted
- 5 tablespoons unsweetened cocoa powder
- ½ teaspoon table salt
- 1¼ cups granulated sugar
- 3 eggs
- ¾ teaspoon vanilla extract
- ¾ teaspoon white vinegar
- 1 cup all-purpose flour
- 10–12 drops Wilton red food coloring (adjust to desired color)
- 1 cup white chocolate chips, divided

How to Make Red Velvet Brownies
Step 1: Preheat the Oven
Preheat your oven to 350°F (175°C).
Step 2: Prepare the Baking Pan
Line a 9×9-inch baking pan with parchment paper and spray it with nonstick cooking spray to ensure easy removal later.
Step 3: Mix the Wet Ingredients
In a large mixing bowl, whisk together the melted butter, cocoa powder, salt, and granulated sugar until everything is fully combined.
Step 4: Add Eggs and Flavorings
Add the eggs, vanilla extract, and white vinegar to the mixture. Stir until the batter is smooth.
Step 5: Incorporate Dry Ingredients
Gently fold in the all-purpose flour using a spatula. Before it’s completely mixed, add about 7 drops of red food coloring. Adjust with more drops until you reach your desired shade of red.
Step 6: Add White Chocolate Chips
Fold in half of the white chocolate chips (½ cup) into the batter for extra sweetness.
Step 7: Bake the Brownies
Pour the brownie batter into your prepared baking pan. Smooth out the top and sprinkle the remaining white chocolate chips evenly over it. Bake in the preheated oven for about 22–25 minutes. Check doneness with a toothpick; it should come out with a few moist crumbs.
Step 8: Cool and Serve
Allow the brownies to cool in the pan for at least one hour before slicing them into squares. Enjoy your delicious Red Velvet Brownies!
How to Serve Red Velvet Brownies
These Red Velvet Brownies are not only delicious but also versatile. You can serve them in various ways to enhance their flavor and presentation.
A La Mode
- Serve warm brownies topped with a scoop of vanilla ice cream for a delightful contrast of temperatures and flavors.
With Whipped Cream
- A dollop of fresh whipped cream adds a light, airy texture that complements the rich brownies.
Drizzled with Chocolate Sauce
- Enhance the chocolatey goodness by drizzling melted chocolate sauce over the brownies before serving.
Paired with Fresh Berries
- Fresh raspberries or strawberries add a tartness that balances the sweetness, making for an elegant presentation.
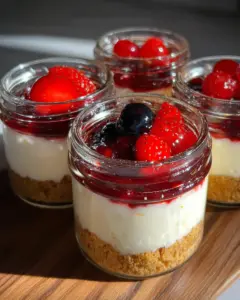
On a Dessert Platter
- Arrange brownies with other desserts like cookies or mini cheesecakes for a stunning dessert spread at parties.
How to Perfect Red Velvet Brownies
To achieve the ultimate Red Velvet Brownies, follow these helpful tips for the best results.
- Use quality cocoa powder: Ensure your cocoa powder is fresh and high-quality for richer flavor.
- Don’t overmix: Gently fold in ingredients to keep the brownies fudgy and prevent them from becoming tough.
- Check for doneness: Insert a toothpick; it should come out with moist crumbs, not wet batter.
- Let them cool: Allow brownies to cool completely in the pan before slicing for clean edges.
- Experiment with colors: Adjust food coloring drops based on preference; start with fewer and increase as needed.

Best Side Dishes for Red Velvet Brownies
Pairing side dishes with your Red Velvet Brownies can elevate your dessert experience. Here are some complementary options:
- Chocolate Mousse
A rich and creamy dessert that adds an extra layer of indulgence. - Vanilla Ice Cream
Classic choice; its simplicity balances the bold flavors of red velvet. - Fruit Salad
A refreshing mix of seasonal fruits adds brightness and balance to the richness of brownies. - Cheesecake Bites
Mini cheesecakes offer a delicious contrast in texture and flavor, making them perfect companions. - Mocha Coffee
The coffee’s bitterness enhances the sweetness of the brownies, creating a delightful combo. - Caramel Sauce
Drizzling warm caramel over brownies can take this treat from good to unforgettable!
Common Mistakes to Avoid
To ensure your Red Velvet Brownies turn out perfectly, avoid these common mistakes.
- Overmixing the batter: This can cause your brownies to become dense and tough. Mix just until combined for that fudgy texture.
- Skipping the cooling time: Cutting into brownies too soon can lead to a gooey mess. Let them cool in the pan for at least an hour for clean slices.
- Using the wrong size pan: Always use a 9×9-inch baking pan as specified. A different size can alter baking time and texture.
- Not measuring ingredients accurately: Baking is a science! Use measuring cups and spoons to ensure accuracy for best results.
- Ignoring food coloring adjustments: Start with fewer drops of red food coloring and gradually add more. This helps you achieve your desired shade without going overboard.
Storage & Reheating Instructions
Refrigerator Storage
- Store Red Velvet Brownies in an airtight container.
- They can last up to 5 days in the refrigerator.
Freezing Red Velvet Brownies
- Wrap individual brownies in plastic wrap or aluminum foil.
- Place them in a freezer-safe container; they will keep for up to 3 months.
Reheating Red Velvet Brownies
- Oven: Preheat to 350°F (175°C) and heat brownies for about 10 minutes. This keeps them warm and fudgy.
- Microwave: Heat one brownie on high for 15-20 seconds. Check to avoid overheating, which makes them tough.
- Stovetop: Place a brownie in a skillet over low heat, covered, for about 5 minutes. This method keeps them moist.

Frequently Asked Questions
How do I make my Red Velvet Brownies more flavorful?
You can enhance flavor by adding a pinch of espresso powder or using high-quality cocoa powder. Experiment with extracts like almond or hazelnut for variety!
Can I substitute white chocolate chips?
Yes! You can use dark chocolate chips or even nuts if you prefer a different texture in your Red Velvet Brownies.
What’s the best way to serve Red Velvet Brownies?
These brownies are delicious on their own, but you can also serve them warm with vanilla ice cream or whipped cream on top for an extra treat!
How should I store leftover Red Velvet Brownies?
Store any leftovers in an airtight container at room temperature or refrigerate them to keep them fresh longer.
Can I make these brownies gluten-free?
Absolutely! Substitute all-purpose flour with a gluten-free baking blend. Ensure other ingredients are gluten-free as well.
Final Thoughts
These Red Velvet Brownies are not only rich and indulgent but also versatile enough for various occasions. Perfect for holidays, parties, or simply satisfying your sweet tooth, they are sure to impress! Don’t hesitate to customize them by adding nuts or switching up the chocolate chips based on your preferences.

Red Velvet Brownies
- Total Time: 40 minutes
- Yield: Approximately 16 servings 1x
Description
Indulge in the delightful world of Red Velvet Brownies, where the classic dessert gets a vibrant makeover. These rich, fudgy treats combine the signature red hue of red velvet cake with creamy white chocolate chips for an unforgettable flavor experience. Perfect for any occasion—whether it’s a festive holiday gathering or a cozy night in—these brownies are sure to impress your guests and satisfy your sweet cravings. The moist texture and subtle cocoa flavor make them irresistible, while their stunning appearance adds a touch of elegance to any dessert table.
Ingredients
- 12 tablespoons unsalted butter, melted
- 5 tablespoons unsweetened cocoa powder
- 1¼ cups granulated sugar
- 3 large eggs
- ¾ teaspoon vanilla extract
- ¾ teaspoon white vinegar
- 1 cup all-purpose flour
- 10–12 drops Wilton red food coloring
- 1 cup white chocolate chips
Instructions
- Preheat your oven to 350°F (175°C) and line a 9×9-inch baking pan with parchment paper.
- In a mixing bowl, whisk together melted butter, cocoa powder, salt, and sugar until smooth.
- Add eggs, vanilla extract, and white vinegar; stir until well combined.
- Gently fold in flour and red food coloring until just mixed.
- Fold in half of the white chocolate chips.
- Pour batter into the prepared pan, sprinkle remaining chips on top, and bake for 22–25 minutes.
- Allow cooling for at least one hour before slicing.
- Prep Time: 15 minutes
- Cook Time: 25 minutes
- Category: Dessert
- Method: Baking
- Cuisine: American
Nutrition
- Serving Size: 1 serving
- Calories: 210
- Sugar: 15g
- Sodium: 150mg
- Fat: 10g
- Saturated Fat: 6g
- Unsaturated Fat: 4g
- Trans Fat: 0g
- Carbohydrates: 28g
- Fiber: 1g
- Protein: 3g
- Cholesterol: 40mg